Constraining an Insect Leg
I’m going to be creating and working with a very basic model for this tutorial because this tutorial will be about constraining a six-legged creature, and not about techniques in modeling one. However, I will be providing a couple of modeling tricks along the way, but mostly just to expedite the project. This tutorial assumes basic knowledge of Animation:Master, specifically of modeling, as well as creating and manipulating bones.
Note: I have all my settings in centimeters. You might want to use this unit for the purposes of this tutorial. Go to Tools > Options and Click on the “Units” Tab. From the pulldown menu underneath the heading, “Units of Measurement”, select centimeters. Also, I use naming schemes that rely on underscores. This is important because, later in the tutorial, we will be manipulating our model file in a text editor. Please use my naming conventions while following along with this tutorial.
Furthermore, this tutorial was done in A:M 8.5. However, these techniques are still applicable though you may have to find the options elsewhere than where my tutorial tells you to find them. Also, even though I did this tutorial using a Mac, I use the “Right Click” convention to denote calling up contextual menus. For Mac users who do not have a two button mouse, “Command Clicking” is the way to call up contextual menus on a Mac in A:M 8.5.
Finally, this rigging tutorial basically amounts to applying the 2001 Rig (the limbs part) to legs that bend at two joints. If you’re already familiar with this rig, you can probably forego this tutorial.
-
Model a Sphere and extrude a leg segment. I sculpted mine just a little to give the leg a little shape. Make sure that you move these parts off of the y-axis into negative values (in other words, from the front view, off to the left), and the x-axis into positive values (in other words, up).
-
Go into bones mode by hitting the F6 key, or clicking on the bones mode button at the top of your screen.
-
Add a bone that starts at the center of the sphere and goes out to the left past the end of the extruded leg segment. Technically, its ending point should be the same distance as from the center of the sphere to the beginning of the leg segment. Here are my values for this bone:
Start Pos. End Pos. –9.91 –61.2 18.82 18.82 0 0 giving this bone a total length of 51.29 cm. Name this bone “R_Mid_Leg1” and assign all the control points of the sphere and the leg segment to it. Make sure that the Roll Handle is pointing upwards.
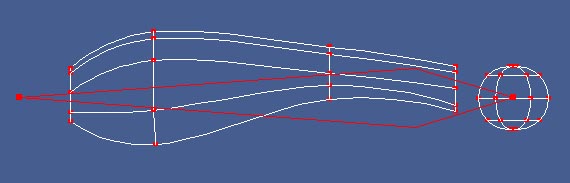 The basic leg segment and its bone
 -
Go back into modeling mode by hitting the F5 key, or selecting the modeling mode button from the top of your screen.
-
Select from the “Tools” menu “Options”. In the “Units” Tab, find the “Paste/Extrude Offset” and make both the x and the y values 0. Click OK.
-
Select the whole model.
-
Go to the Edit Menu and select “Paste with Bones”. Notice that immediately under your first bone, “R_Mid_Leg2” was created.
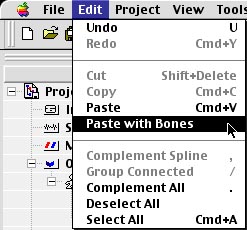 “Paste with Bones”
 -
Go back to bones mode (F6) and select “R_Mid_Leg2”. Go into its Properties by selecting the “View” menu and then “Properties”. Click the “Heirarchy” Tab, and make sure that the “Move Control Points” option is checked on. In the X Offset field, type in the value of the length of the bone as a negative number. In my case, the proper value to type in would be “–51.29”.
 The result of having pasted with bones, and moved the second bone to the left.
 -
Repeat steps 4-8 twice more so that you have a total of 4 spheres and 4 leg segments.
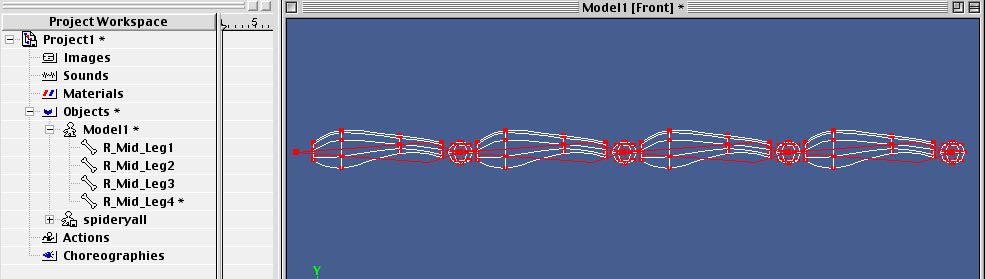 After all the “Paste with Bones” and moving those bones.
 -
Rename the last bone “R_Mid_Foot_Geo”
-
Back in modeling mode, sculpt the very last segment to look like a short spike. This will serve as a foot. Also, in bones mode, shorten the length of the bone by either pulling back on the tip or, select the bone, hit the ‘S’ key to scale, and scale it down.
-
Finally, make the bones all children of one another and in order, and turn the “Attached to Parent” option on in their Bones Properties.
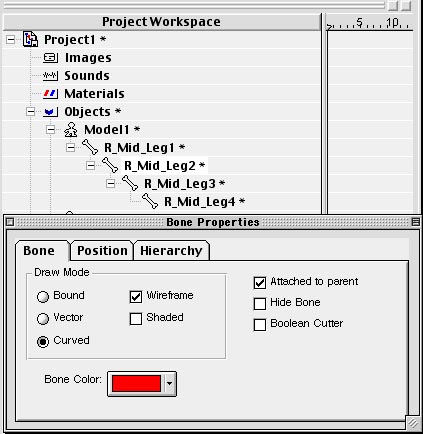 Reorganizing the Hierarchy of the Bones and having made sure that the bones were attached to their parent bones.
Positioning the Leg
-
Still in bones mode, take “R_Mid_Leg1” and, in the Heirarchy Tab of its Properties, type in “–40” degrees on the Z axis to rotate it by that amount. Make sure that “Move Control Points” is checked.
-
Select “R_Mid_Leg2”. In the Heirarchy Tab of the “Properties” Panel, type in “40” degrees in the Z field. Also do this for “R_Mid_Leg3”.
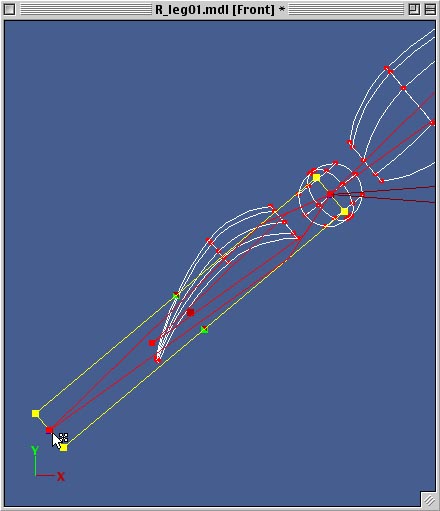
 The model repositioned. Notice that the foot is on the x axis.
Setting up the Rig Bones
-
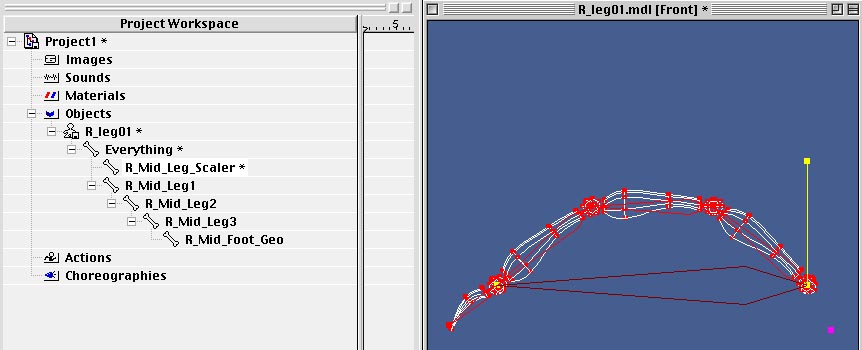
Before we go much further, we should add the bone to which all others will be parented. From the Top View, add a bone. Move or adjust its postion via the Properties Panel so that its values are
Start Pos. End Pos. 0 0 0 0 0 50 In the end, its height and length (the y and z values) aren’t critical, but its left and right positions are. Make sure that the x values are zeroed out. Now, to make it the master parent, drag “R_Mid_Leg1” on top of this new bone. Name the new bone “Everything”.
-
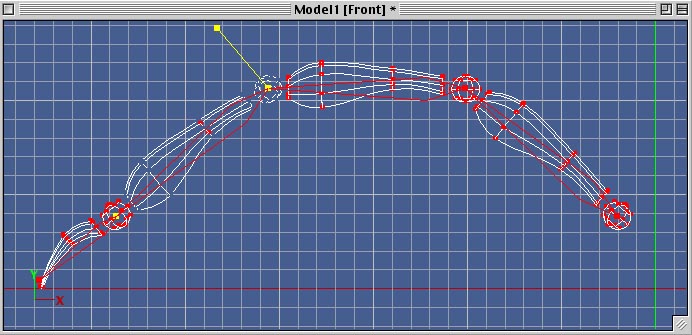
From the front view, create a bone that starts at the back of “R_Mid_Leg1” and goes to the back of “R_Mid_Foot_Geo”. Make sure its Roll handle is pointing upwards. Also, make sure that it has been added through the center of the leg geometry. Chances are, A:M will have added it at the same height as the ending point of the previous bone we added, the “Everything” bone. If it has, move it back so that the bone runs through the center of the model. Finally, make sure that this new bone is a child of the “Everything” bone. Call it “R_Mid_Leg_Scaler”. If you’ve been following along this tutorial closely, this bone should be flat with its beginning and ending height (or y values) at 18.82cm. This bone being flat makes life easier.
 The long bone that goes from”‘R_Mid_Leg1” to “R_Mid_Foot_Geo”
 -
As a child of the “R_Mid_Leg_Scaler” bone, add a new bone directly underneath the first knee joint. Its Roll Handle should point back towards the back end of the “R_Mid_Leg_Scaler” bone. It should also be as close as possible to being in the axis of the “R_Mid_Leg_Scaler” bone. In this case, that’s easy enough because our Scaler bone is flat. Have the starting height of this knee be at 18.82cm. Call this bone “R_Mid_Knee1”.
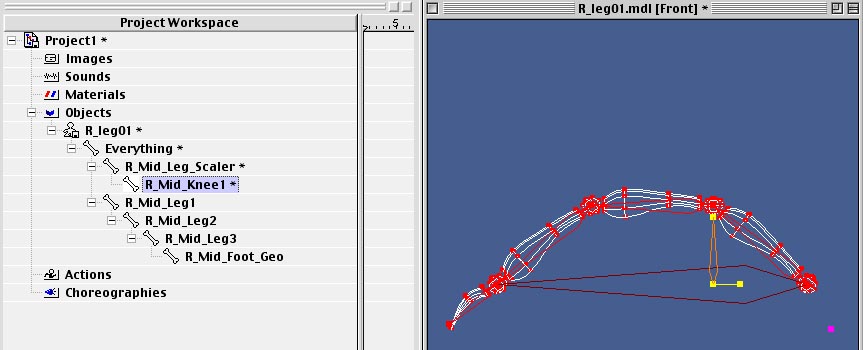 Adding the first knee joint
 -
As a child of “R_Mid_Knee1”, create a bone very close to the back end part of the “R_Mid_Leg_Scaler” bone. This should also be in line with the axis of the “R_Mid_Leg_Scaler” bone, point nearly straight up, and have its roll handle face back. Call it “R_Mid_Thigh_Orienter1”.
 Adding the Thigh Orienter
 -
Select “R_Mid_Knee1”. While holding down the Control key, drag this bone up to its parent, “R_Mid_Leg_Scaler”. This is a trick to exactly copy and paste bones. Notice in the Project Workspace that “R_Mid_Knee2” and “R_Mid_Thigh_Orienter2” were automatically created as children of the Scaler bone.
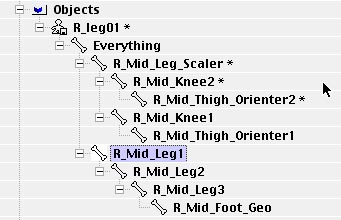 Control Dragging “R_Mid_Knee1” to its parent creates an exact copy of that bone and its children.
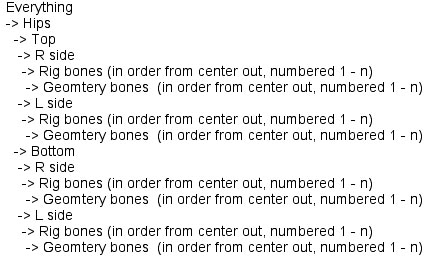
Side Note: By now your hierarchy in the Project Workspace may look different than mine. I like to keep my bones visually organized. To reorganize bones, all you have to do is drag them around. For example, when we did step number 2 of this section, I dragged that bone to be higher in the hierarchy. I did this because I like to have my Rig bones higher than my Geometry bones. This may not be your preference, and you are free to organize your bones any way you wish. I choose this following scheme of organizing my bones:
-
Select “R_Mid_Knee2”. In the Hierarchy Tab of the Properties Panel, type in “–51.14” into the X Offset field. (I chose this number in order to place the second knee bone directly underneath that joint.)
 Move “R_Mid_Knee2” underneath the second knee joint of the model.
 -
Select “R_Mid_Foot_Geo”. Control drag it up to the “Everything” bone. This will create “R_Mid_Foot_Geo2” immdeiately underneath it. Rename it “R_Mid_Foot”. Hit the ‘S’ key to open a scaling box for that bone. Drag out the tip of the Scaling box in order to lengthen the bone. It is very important that it be at same level in the hierarchy as the Scaler bone.
 Control Dragging the foot geometry bone to the Everything bone creates an exact copy. Rename it by dropping the “geo” part of its name, and scale it.
Adding the Constraints
-
Now you’re ready for the rigging part: Open up a new pose window. Call this pose, “Rig”.
-
Select “R_Mid_Leg1”. Right Click it and select the “OrientLike” Constraint. Pick “R_Mid_Thigh_Orienter1”.
 Add an OrientLike Constraint to the first Geometry thigh bone. The result should be the leg sticking straight up.
 -
Select “R_Mid_Leg_Scaler”. Right Click it and select the “AimAt” Constraint. Pick “R_Mid_Foot”. Then click the “Scale to Reach” option at the bottom of this Constraints properties.
-
Select “R_Mid_Leg2”. Right Click it and select the “OrientLike” Constraint. Pick “R_Mid_Thigh_Orienter2”.
-
Select “R_Mid_Foot_Geo”. Right Click it and select the “OrientLike” Constraint. Pick “R_Mid_Foot”.
-
Select “R_Mid_Leg3”. Right Click it and select the “Kinematic” Constraint. Pick “R_Mid_Foot”.
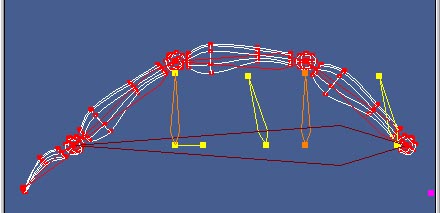
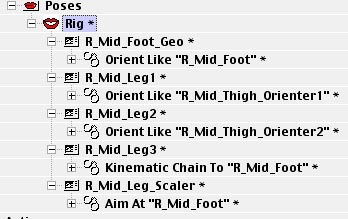 All the Constraints applied.
 -
The leg is now functional! Hide the Geometry bones by selecting the “R_Mid_Leg1” bone and, while holding down the Shift key, checking the “Hide Bone” box. Also hide the Scaler and the two Orienter bones. You will now have an uncluttered model to easily animate.
-
Open up an action window, apply the pose, and play around! : )
Adding More Legs
-
Save your model. Right click on the model and choose “Save As”. This will save the model as an .mdl file, in other words, as an individual model file separate from any choreography, material, action, or project.
-
Delete the instance of your model from your Project Workspace.
-
Leave Animation:Master and open a text editor. SimpleText, WordPad, Notepad are all good for this purpose. (OS X users: by default, OS X’s TextEdit only saves files in Rich Text Format. Change your preferences to make sure you can save in plain text.)
-
In the Text Editor, open your .mdl file. Do a Find and Replace. You’ll want to find “R_Mid” and replace it with “R_Fore”.
-
Once completed, save this file out under a different name, like “R_foreleg”.
-
Do another Find and Replace. This time find “R_Fore” and replace it with “R_Hind”. Save this file under a different name also, like “R_hindleg”.
-
Go back into Animation:Master, and load your first model.
-
Right Click on the model’s name in the Project Workspace and go to Import>Model.
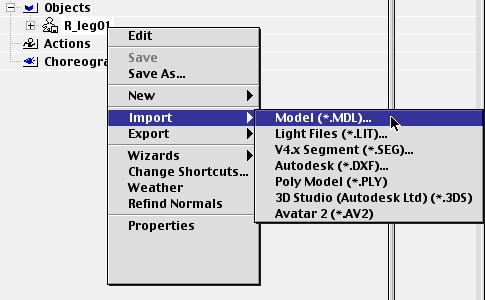 Import the R_foreleg model directly into your first leg model.
 -
Find the first model you saved out of the text editor, “R_foreleg”, and hit Open.
-
Notice that immediately under the “Everything” bone, an “Everything2” bone was created. Also, if you open up the Poses, you’ll see “Rig2” right under “Rig”. It doesn’t seem as though anything else has changed, but this is just because the model we imported matches exactly the model we already have.
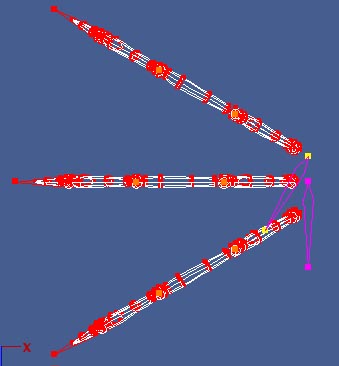
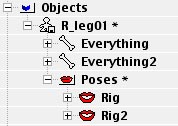 The result of importing the second model directly into the first.
 -
Go into bones mode and select the “Everything2” bone. In the Heirarchy Tab of the Properties Panel, type “15” into the Z Offset field and “30” into the Y Rotate. Make sure that the “Move control points” option is still checked.
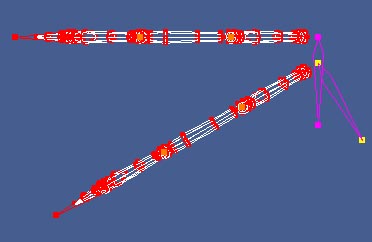 Moving the “R_foreleg” up 15 cm and rotating it by 30 degrees using the “Everything2” bone.
 -
In the Project Workspace, select the “Everything2” bone. Drag it on top of the “Everything” bone. Delete the “Eveything2” bone.
-
Save this model under yet a different name. Right Click the name of the model and go to “Save As”. Call this model, “R_side”.
-
(These next 4 steps are almost identical to 8 - 12). Right Click on the model’s name in the Project Workspace and go to Import > Model. Find the second model you saved out of the text editor, “R_hindleg”, and hit Open.
-
Again, an “Everything2” bone has been added beneath your “Everything” bone, and “Rig3” has been added to your Poses.
-
In bones mode, select the “Everything2” bone. In the Heirarchy Tab of the Properties Panel, type “–15” into the Z Offset field and “–30” into the Y Rotate. Make sure that the “Move control points” option is still checked.
 Moving the “R_hindleg” back by –15 cm and rotating it by –30 degrees using the “Everything2” bone.
 -
In the Project Workspace, select the “Everything2” bone. Drag it on top of the “Everything” bone. Delete the “Eveything2” bone. Save the file.
-
Go into the “Rig” Pose. Making sure that the “Key Constraints” and “Key Model” buttons are depressed at the bottom of the screen, drag “Rig2” onto the Pose screen. That will apply all the data from that Pose into the current one. Do this with “Rig3” as well. You’ll know this has been done correctly when the 2 other legs snap into place. Once finished, delete the “Rig2” and “Rig3” Poses, and save the model.
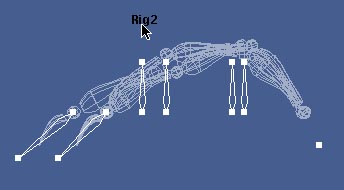
 Dragging the “Rig2” Pose onto the “Rig” Pose. Make sure that the “Key Constraints” and the “Key Model” buttons are depressed.
 -
Now we have a fully functioning right side!
-
I recommend adding two more bones for the purposes of making animation and organization easier. In bones mode, add the first bone at the center of the model space. My values for this bone are
Start Pos. End Pos. 0 0 18.82 18.82 –10 40 Call it “Thorax”
-
Add another bone somewhere to the right (that is, the right of the model’s - if you’re in Top View, you will draw it on the left side of the model from your perspective) of the center bone. Call it “R_Side”.
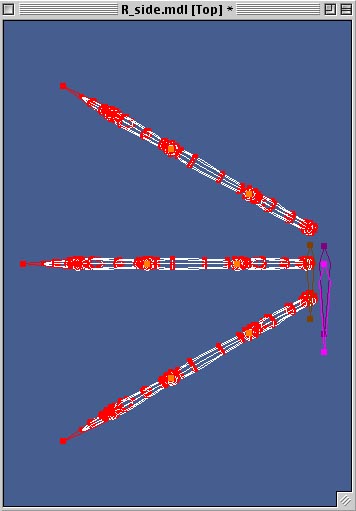 Having added the “Thorax” and the “R_Side” bones.
 -
“R_Side” should be a child of “Thorax”, and you should now drag “Thorax” on top of “Everything”. Then, drag all the limbs onto “R_Side”. The feet, however, should remain children of “Everything”. Hide the “Everything” bone and the “R_Side” bone.
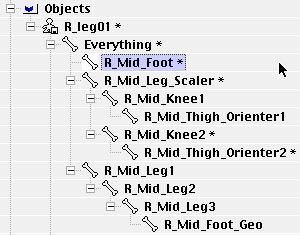
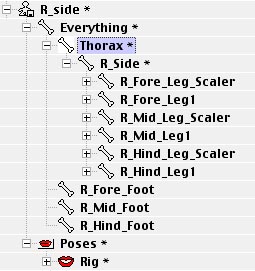 The final hierarchy of all the bones. By putting the Feet bones at the same height as the Thorax, when you move the Thorax around, the feet will stay planted in place.
 -
Open a new Action, apply the Rig Pose and have fun! : )
Don’t believe me? Watch a Quicktime movie of a walk cycle that I very rapidly produced with the rig and see for yourself!